Tech Guide

Making the case for Instagram at your Library: 10 reasons to set up a profile

Part 3 of the Instagram mini series (here’s the introductory part one, we’ll reference part two a little further down the page).

This is not a post about how to use Instagram well: this is a post about how to make the case to use Instagram in the first place. When I run workshops there are very often organisations represented that simply won’t yet allow the (enthusiastic, knowledgeable, social-media savvy!) attendees to set up a Library Instagram account… Sometimes there are librarians who are allowed to create the account but a little bit nervous about not being expert photographers, and we’ll talk about that as well.

The subtitle of this post is ‘10 reasons to set up a profile’ and rather than being the reasons I’d personally choose, these are meant to be reasons to give to senior managers who are not convinced setting up a library account is the way to go.

So here’s the scenario: you ask to set up an Instagram account for the Library, and the decision-makers say no. Or they say: maybe, but show us why. Below are ten potential replies, some or all of which you can try working into the conversation.

1. Rival ORG X do it…

Without wishing to be too Machiavellian about it, pointing to the success of a comparable institution who already use Insta can be useful. Not necessarily to provoke a sense of competition or jealousy, but more to say ‘it can be done by an organisation like us, and here is the proof’. (I don’t actually think libraries are ever really rivals!) It’s reassuring to have an example of success to look to, and evidence that there are gains to be had that make it worth the time it takes.

In particular, it’s worth pointing people towards specific posts, not just the URL of the comparable account itself. So you can say ‘this is how X tackled the issue of covid-etiquette in the library, and here’s the response they got’ for example, or ‘here is how Y promote their Special Collections’ - build your case with specific examples that speak to the strategy / priorities of the managers. And talking of successful examples, this leads us on to the next argument…

2. We can learn from your main account!

This won’t be the case every time, but a lot of libraries have ‘parent’ organisations which will already have a profile on Instagram. So for example your local authority for public libraries, or your University for academic libraries. In itself this is a useful precedent to cite, but it’s also genuinely useful as a way to quickly understand what your community responds to.

Generic advice on what to post can be really useful, but nothing beats taking an approach based on the evidence of what your specific audience likes - the parent org’s Insta will show you. If you work at a University you can say, as part of your proposal for a library account, ‘we already know what our students respond to most - they like video content that gives them clear instructions on how to use services’ or whatever it is you deduce from the relative popularity of the Uni Instagram’s posts.

An Insta post showing 1928 Likes and 5 Comments

A screenshot of a hovered-over Insta post

The actual mechanics of finding out what your audience already likes are these: go to the parent org’s Insta account on a PC (or Mac) rather than a phone / tablet, and hover over their most recent 15 or so posts in turn, noting the number of Likes and Comments for each (as show here). Some will be way higher than the average, and some will be way lower - you don’t need to be a social media analytics guru to spot trends and see what content types engage the audience most. Even for well established accounts this is an invaluable technique and I’d recommend it to everyone.

3. You didn’t let us do FB and Twitter either - but now you do

I’m sure there are exceptions but it seems like almost all libraries go through the same journey. In the 2000s they asked to set up Facebook accounts and were told no; eventually FB became so prevalent the powers that be changed their minds.

Leading up to and moving into the 2010s, everyone asked to set up Twitter accounts - no, they were told; stick with FB. Then eventually, Twitter became so prevalent the powers that be changed their minds.

And now in the 2020s it’s happening with Insta (and may well happen with TikTok also) - the same process, whilst risk-averse management get comfortable with the idea that Instagram is a) legit and b) here to stay (more on which later). So there may be some mileage in saying ‘history shows we WILL eventually get onto this platform so why not start earlier, gaining more experience along the way and reaping the benefits sooner?’

4. Instagram is the most engaged with social media platform

We covered this in detail in the previous post, part 2 of this series. The short version is the amount of people who DO something in response to Instagram posts (as opposed to people who passively consume a post but don’t press the Like button, or comment / reply, or reshare, or any other kind of interaction) is much greater that the amount of people who do something in response to Twitter and FB posts. Not only that, but libraries are part of the most engaged-with industries on Insta. So when you post, people react: that’s more important than, for example, sheer numbers of followers. It’s the first step to converting this into ‘off-site’ actions, like using resources, visiting buildings, or signing up for classes etc.

5. Instagram is here to stay

I personally wondered if Insta, with its meteoric rise, might burn brightly for a while and then fade. I was completely wrong. It is growing all the time in terms of sheer number of active users, and is predicted to continue to expand as this graph from Statista shows:

Graph shows 1,050 million Instagram users in 2021, rising to a projected 1,554 million in 2025

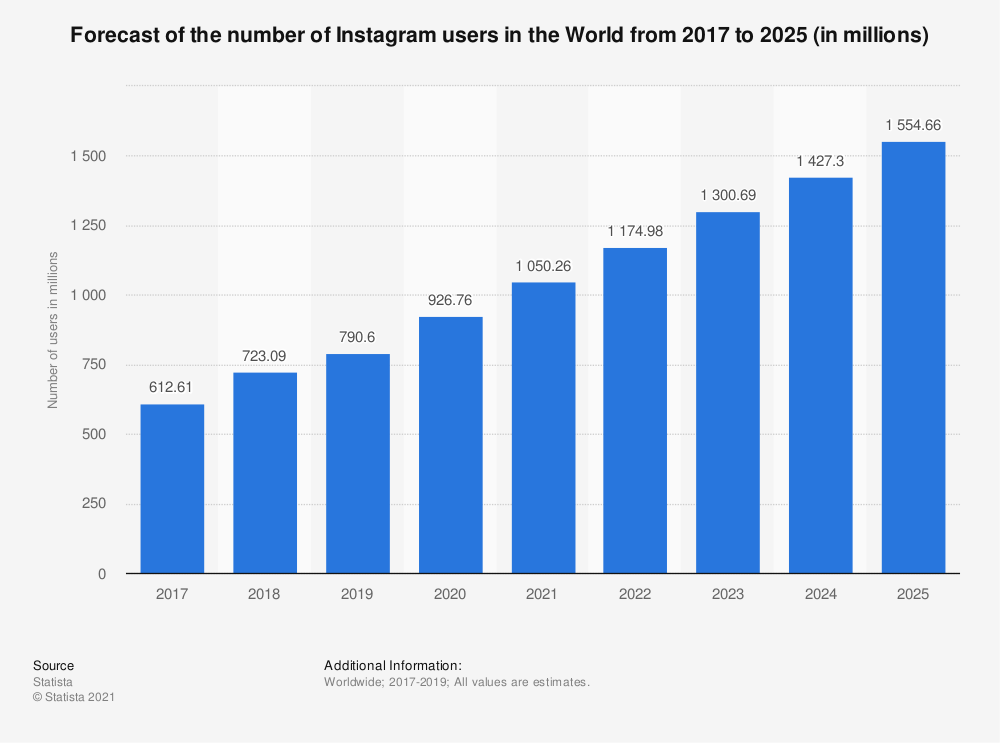
It’s also worth noting that the time spent on Insta each day by its users is also increasing according to TechJury, from 15 minutes per day at the start of 2019, to 30 minutes per day by midway through 2020.

All in all, then, Instagram seems extremely likely NOT to be one of those platforms where you invest a load of time and then see it all go to waste when the public moves on (like Snapchat was, for example).

6. Instagram is full of the younger demographic which is key to libraries

31% of Instagram users are aged 18-24, versus 17% for Twitter and 11% for FB - and in total over 70% on Instagram are 34 or under. There are a few library sectors not interesting in trying to get younger audiences to use their services, but not many: for academic libraries Insta is THE platform our students are all on, and for public libraries it’s populated by that key generation of potential library users who are younger than the overall average, but no longer children… Getting them to become life-long library users from the start of adulthood is a great goal, and Instagram can help with that.

7. You absolutely do not need to be a brilliant photographer or own a better camera than the one on your phone, to use Instagram successfully

For me Instagram has just the right amount of photo-manipulatability… Of course there are apps which allow you to do way more, but I don’t want EVERY option for editing; I just want some really useful ones. The combination of basic editing and flattering filters mean you can make the images you post on Insta look brilliant, even if you’re using a normal smartphone and don’t have a background in photography.

More importantly though, it is the subject of the image which matters most on Instagram, not the quality of the photograph. A brilliant picture of something prosaic will not get much engagement; a regular picture of something visually arresting will get Likes and Comments. (Obviously a brilliant photo of something really exciting is the best of both worlds, but the point is regular members of library staff can achieve success here without photography lessons and specialist equipment…)

8. You can now post from the desktop so staff don’t need a work account on their personal devices

Instagram was launched in October 2010. From then until the end of October 2021, you could not post on Instagram from a desktop: you had to use the app, unless you knew the hack.

That’s 11 long years for the idea to take hold that you need Instagram on your phone, and a lot of people don’t realise this is no longer the case (myself included until my colleague Megan told me about this the other day!). I’m delighted about this because I think some people, quite rightly, felt uncomfortable about having a work app on a personal device, so using Instagram instantly became something of a compromise, blurring those home-life / work-life boundaries. This is no longer the case: you can use it from instagram.com on your desktop, and keep those two worlds completely separate - potentially widening the pool of staff who feel happy to get involved with providing content for a library account.

9. IN THE CULTURAL SECTOR, INSTAGRAM USE IS HIGH

This means that there are LOADS of other libraries already there which we can learn from, and not only that but loads of museums, galleries, archives and other cultural sector organisations too. So many examples out there means it’s easier to find a model to suit the one your library would like to adopt, and means there are constant opportunities to learn, to develop new ideas, and potentially to develop partnerships too.

10. Last but definitely not least: we can improve the reputation of the library with Instagram

Instagram isn’t a hard marketing platform. (That’s part of what makes it fun to use.) What it does is keep the library in the mind of the user, showcase nice library locations, raise awareness of services and collections, and break down some barriers as to how people think about libraries in general. When used well, Insta will have a positive impact on the way your library is perceived, and help you deliver key messages. That’s argument enough for me on its own, but it’s not enough for everyone then there are nine other reasons to try above…

Good luck!

8 tips for teaching library sessions online

We’ll all be teaching infolit online for the foreseeable future (I hope) and it is, as anyone who’s done much of it will tell you, a very different experience to being in a room with people.

I do a lot of training online already for overseas audiences, so I have some familiarity with this. For what it’s worth, here are some tips for retooling your sessions to work in a webinar type environment.

  1. Plan your session so your audience switches frequently between listening and doing

    I don’t know how you currently do your workshops, obviously, but if for example you do a 20 minute intro, then give people 20 minutes to do a task or two, then 10 minutes summing up at the end, you may find it worthwhile to rejig this a bit.

    In the online environment where everyone is learning on screen, too much of anything for too long is a barrier to engagement. Long talky bits are really hard to pull off, and long activities don’t often work either. And indeed, long sessions overall - if you had a 2 hour class booked, make it 1.5 hours max for screen-learning.

    In my experience, relatively short bursts of talking interspersed with relatively short bursts of activity works best. So take a big exercise and split it into two; introduce part one, let them try it, introduce part two, let them try that. And so on. Short, sharp chunks. (Can you have sharp chunks? Shards, maybe.)

  2. Mute participants (apart from specific times for questions)

    I always, always have participants muted as they enter the online space. If everyone’s mic is live, it quickly becomes a cacophony of noise that makes it impossible for anyone to really concentrate. (Honestly just one person having a chat with someone in the same room is enough to derail things.)

    I encourage questions at any time via the Chat (more on which below) rather than audio - however sometimes it can be beneficial for people to ask questions out loud rather than type them. If you want to do that, have a clearly designated time in the session when this will be possible, and signpost it ahead of time. “On 30 minutes we’ll pause, and anyone who wants to unmute and ask a question can do so then.” Then the conversation happens, everyone mutes again and you carry on from there.

    If you do this it’s important to wear headphones, otherwise the audience’s questions come out of your PC speakers, into your mic, and back out of the speakers again - this causes all sorts of problems and is definitely best avoided…

  3. Consider using your webcam for the intro, then turning it off

    Assuming you have a webcam and video is an option, there’s a balance to be struck there too. Webcam-on for the whole session is, in my experience, not conducive to good teaching. You instinctively present to the camera, and this means you’re worrying about that side of things rather than your slides and the Chat. Especially if you’ve not done too much online teaching before, I’d keep things as simple as possible because there are so many more things to juggle than in an online session. You can choose to not use the webcam at all (that’s fine!), or use it for the intro and then say ‘now we’re moving into the session and using the slides, I’m going to turn off the webcam so you can see my screen better’.

    This is because part of each slide is blocked by your own face with the webcam. I have done a workshop where for specific reasons the whole thing was camera-on, and I found it useful to work out exactly how big the camera-window would be and create a Shape in PowerPoint that was the exact dimensions. I then put this on every slide and made sure no content was going in that part, so nothing would be obscured by the window later (which I positioned over the Shape).

  4. The Chat function is absolutely key

    If you’re using webinar software then Chat will be a way your audience can ask you, and each other, questions. Confusingly there is also a Questions function in things like GoTo Meeting - and it’s really important to shepherd people toward Chat rather than Questions. Questions are only seen by you, but Chat is seen by all participants. Obviously if someone had a sensitive query, the DM-style Question is the way to go - but for everything else, you want to encourage active participation as much as possible. Often the difference between good online training and great online training is the Chat - the more people talk to each other and to you, the more than barriers of it being online fade away and the more useful the session becomes.

    Whether you’re using Hangouts style software or webinar software or Google Q&A, it goes without saying you need to keep the Chat where you can see it at all times. You can have particular periods of the session when you dip into it and respond to what has been asked, but seeing the questions as they come in is vital for engaging the audience. Obviously if you have a second screen this helps a lot, but if you don’t have that option it’s still worth making sure the Chat is visible to you always.

    I tell people about it at the start, and I remind them about two minutes later - I tell them about it again and again because sometimes people need encouragement to use it, but once they do everyone tends to join in. Teaching is so much richer when you respond to the audience’s specific needs, so it has to be a priority to make sure these needs are expressed…

  5. Get used to not speaking

    What separates good online teaching from boring webinars is interactivity. The Chat is key to this as discussed, but so is getting people to DO things and - trust me on this - it feels really, really, weird to give people time to do activities and exercises while you sit there in silence. But it’s better to have a couple of 5 or 10 minute activities where your audience are genuinely given time to try things out and then report back in the Chat.

    I find this really tricky because you become hyper-aware of the dead air. You’re not wandering around checking what people are doing, you can’t see them working or hear them chatting to each other. You feel faintly absurd, sitting there in front of your PC and hoping people are using the time you’ve given them to do the thing you’ve asked them to do. But it’s essential - it stops it being a classic ‘boring webinar’, one-way traffic delivered as a lecture on screen which, even if you’re great at public speaking, is not enough to truly engage most audiences.

    I find the not-speaking part so hard that I set a stop-watch for it every time. If I’ve told the group they have 10 minutes, I’ll start a stop watch and not stop them until 10 minutes is up. If I don’t take this measure, I inevitably get angsty 6 minutes in and then move things on prematurely…

    I always mute my mic for these parts - no one wants to hear the click of your keyboard etc - but check in on the mic a couple of times during the period to say ‘don’t forget if you have any questions or something isn’t working as you’d expect, ask me in the chat’. When people ask a good question I’ll come back on the mic and pick it up with the whole group, just as I would with a face-to-face session.

  6. You may wish to stand up…

    Teaching needs energy, and sometimes it’s hard to bring energy when you’re sitting down! If your mic and other equipment allows it and you’re comfortable doing so, standing up to deliver your session just as you would in a seminar room can really help. Without hand gestures and facial expressions it’s already hard to get your point across dynamically, so your delivery counts for a lot.

    Something solo radio DJs apparently do a lot is put something opposite them to stand-in for the audience - a cuddly toy or, in one studio I saw, a Policeman’s helmet - and they talk to THAT. Rather than talking just generally into the ether, addressing something specific (even something faintly ridiculous) will focus your delivery and make it more human. So grab some sort of mascot and stick it above your monitor…

  7. If you can do online teaching in pairs, take that option

    Managing an online session is quite stressful - if anyone has technical problems you really can’t help them and teach at the same time. So pairing up, with one person teaching and another facilitating, is well worth doing if you can. The Facilitator can be on hand to help participants, both with the logistics of the online session and with the exercises themselves - they can also message the presenter to flag up a Chat question if they miss it. Working as a team in this way allows you to teach better because you’re not splitting your focus. 

  8. Good slides matter more than ever

    If you’ve read this blog before you’ll know I think good slides are important. In online teaching they’re even more so, because they’re the only thing your audience can see. It’s not just that they can’t see you; they can’t even see each other. So something inspiring on the screen is really essential - especially if your online session is coming as part of many, many other sessions also online. Death by PowerPoint will not do.

    There’s plenty of guidance on this site about making good presentations. A couple of posts to start with would be the Alternatives to Bullet Points and the Sources of CC0 Images articles: but really anything with the presentations tag is potentially relevant.

    Unbelievably this general guide to slide-making is 6 years old now, but although some of the links to image sources are out of date, and, frankly, I’d make very different font choices nowadays, the basic principles are still important for producing effective presentation materials!

Accessibility and online teaching

I don’t want to position myself as an expert on this but I do have advice on making your slides more accessible (thanks to Rachel fro the prompt!). The main thing is to use PowerPoint and turn on the subtitles function - if you’ve never used this you’ll be amazed at how well it works. PowerPoint provides subtitles of everything you say, as you say it. You can find the Settings for this in the Slideshow part of the menu:

The Subtitles function, found in ther Slide Show menu in PowerPoint

Otherwise all the normal rules apply.

  • Good contrast between font colour and background. It’s important to have plenty of contrast, for example black text on white background, so the text is easy to read. Purple on black for example doesn’t work. Related to this, don’t put text over a busy background.

  • Minimum font size of 24. Anything less than 24 risks being hard to read on a small screen; if you need the font smaller than 24 there’s probably too much information for one slide.

  • Use sans-serif fonts. Sans-serif fonts such as Calibri and Arial are better than Serif fonts such as Times New Roman or decorative / script fonts.

  • Don’t use colour as the only indicator of key information. You will almost always have at least one colour-blind audience member. It’s important to avoid using colour as the sole way of conveying information. For example, to have something shown in red to say stop doing it and something else in green to say start doing that, is not sufficient. Use the text, or a tick and cross or other non-colour-based-visual indicator, to ensure people understand what you’re telling them.

  • Repeat Chat questions back. This is good practice anyway: if someone asks a question in the chat, say it out loud for everyone to hear before answering it.


There’s lots more aspects of teaching online that others will be able to go into in more depth, but the 8 things above are, to my mind, key as we #PivotToOnline (as they say on twitter…) Good luck everyone!

Any questions, tips, comments, suggestions, advice? I’d love to hear it in the Comments.

How to post to Instagram from a PC

Posting to Insta is officially mobile-only, and the desktop version doesn’t have the button to add media. But it’s relatively straightforward to trick your desktop into displaying a mobile view, and then you can post from it directly.

There’s a million articles online about using Instagram from a PC or laptop but they’re all ludicrously complicated or involve using third-party apps etc - none of that is necessary, if you follow the steps below. (The screenshots are from Google Chrome but you can do more or less the exact same thing in Firefox.)

1) Go to instagram.com on your PC, and log in

2) Right click anywhere. You’ll see Inspect listed at the bottom of the menu which appears: click that

Log-in to Insta, right-click, and choose Inspect from the menu

Log-in to Insta, right-click, and choose Inspect from the menu

3) You’ll see the html on the right of the screen. At the top of that there’s an icon showing a phone and a tablet - if you hover over it you’ll see it’s called Toggle device toolbar. Click this: the rest of the screen will then display the website on a mobile view. At the top of the screen you’ll see a drop-down menu which allows you to choose what kind of device you want to simulate, so you can choose an iphone or whatever else you want

Choose a mobile device: Chrome will show Instagram as it would appear on that device

Choose a mobile device: Chrome will show Instagram as it would appear on that device

4) Now for the absolutely key bit (thank you to my colleagues Hannah and Antonio for getting me up to speed on this part!): refresh the browser using F5 or the Reload page button. You’ll then see the crucial button, missing until now, that you get on your phone: the + in a square which represents ‘Add picture / video’. Pressing it on your PC will open up the usual file explorer, allowing you to navigate to the media of your choice.

Refreshing the website brings up the Add Media button, highlighted in yellow here

Refreshing the website brings up the Add Media button, highlighted in yellow here

5) Choose a Filter if you like, press Next, add your caption, location, tagged people (and in Advanced Settings you’ll find the option to add Alt Tags too) and click Share to post to Instagram.

Why would you want to use Instagram on your desktop in the first place?

This technique is useful for three main reasons in my experience.

The first and most important thing is, Instagram is such a key social media tool for organisations, but not everyone wants organisational accounts on their personal phone. I work with people who’d rather not mix those two worlds and I completely understand that - but I want them to be able to contribute to our Instagram account without having to compromise their principles! This method means everyone can get involved.

The second reason is, if you already have photography on your hard-drive or network drive, it saves having to get that onto your mobile device’s camera roll.

The third thing is, you can write the post at any time of day and it will stay there waiting for you to post it at the time of your choosing (unless, obviously, you close the window / tab / browser). So if you have 5 minutes to compose the perfect Insta post first thing, but don’t want it to go live till the peak time to post later in the day, you can do the work at 9am and actually post it at 3pm.

Okay that’s it. Happy posting!

Using screencapture software to make next-level PowerPoint presentations

I normally record talks I give at conferences, using my phone in my jacket pocket. I have a strict 'no critiquing myself during the talk itself' rule, so the recording allows me to listen back afterwards and pick up on things that I'd want to do differently next time, or things that worked well etc.

In the past I've also put a video up on YouTube, using Camtasia to record me moving the slides along with the audio of my talk at the LIASA conference in Cape Town. I don't think this worked that well because there was simply too many long periods where nothing changed on the screen - in real life that was fine because the audience looks at the speaker, but in a video - a visual medium after all - it just feels a little inert and uninteresting.

So for a recent talk I decided to try and make a version of the slides that would work as a proper video. I spoke at the CILIP PPRG Conference in January (more on that in a previous post) about our UoYTips marketing campaign - York won a Bronze Marketing Award which I was picking up at the event. I delivered the slides and recorded the talk in the usual way, but then set about creating a new version of the slides that had much more going on visually. The actual slides are here, if you're interested, and here is how they evolved for the video I came up with:

Now I've done this, I'm wondering why I can't just do more visually exciting slides anyway? This doesn't have to be just for YouTube. I've always wanted to use video in presentations more, and it's surprisingly easy to do as it turns out.

The tools

To make the video above I used three bits of software. PowerPoint, obviously, for the slides. Audacity to edit and play the audio (this is free). And Screencastomatic for both the screen-capture videos within the slides, and the overall screen-capture of slides plus audio you can view above. Screencastomatic is a great tool, which I found much easier to use than Camtasia. It's quick and intuitive. It can be used for free, but in order to record videos of more than 15 minutes, and record PC audio, you need the pro subscription - this costs 12 quid year which is pretty great value, I reckon.

Here's what the Screencast-o-matic interface looks like:

too.PNG

It's very easy to redraw the box around the exact part of the screen (or all the screen) that you want to record. You can pause and restart. You can also record PC audio as you go, or narrate into a mic. As you can see it gives you the option of recording from webcam at the same time if you wish, which happens in a smallish box at the top right of the screen.

It's really easy to use.

The techniques

In the video above there are a number of techniques (perhaps that's too grand a word!) employed to suit different types of information.

  • Actual video recorded on my phone. (This happens about 25 seconds in.) I recorded a video in the usual way, emailed it to myself, and went to Insert Video in PPT. You can make it full screen, or you can overlay the branding / visual identity from your PPT over the top. I think this is crucial to how easy this is to do - the video can effectively be the background of the slide, just like an image can. You then overlay it with text, shapes, images etc as normal.

  • Screencasting Google Earth. I really like this one, which happens here. How to have something dynamic on screen while I talk about the University of York? Type it into Google Earth then press record on the screencasting software, and return on Google Earth. It zooms all the way in and then, delightfully, spins round the building you've chosen for a bit. I'm going to use this in library induction sessions in the future, for sure.

  • Using gifs. There's a couple of examples of this, but here's the most interesting one. It starts off as a regular full-screen image, and then I used animation to first of all drop the text on top of the image at the appropriate time, and secondly to trigger the gif video beginning (having downloaded the gif from a gif site, and saved it as a video).

  • Regular PowerPoint animations and transitions. There's a few moments where things are added onto the screen one-by-one as I mention them, and there's this very long fade transition between two slides

  • Videos of websites instead of screengrabs of websites. There's an example here, and another example here. In the talk I just showed a screenshot of the thing I was talking about, but here it's a 15 second video of the site being used, which is much more interesting. I'm definitely going to reuse this technique.

The drawbacks

Really the only two drawbacks are that it takes time, and it takes space.

Of course, recording a clip on a website in use takes more time than just a screenshot, but it becomes surprisingly quick. Perhaps a minute to set-up, record and save / export 20 seconds' worth of screen-capture, so not too bad at all.

In terms of space - the videos are MP4 files and pleasingly small. Most brief captures were under 1 meg. The 22 second-long Google Earth zoom right at the start of the video was 12 meg. The overall final file - a 20 minute video capturing the whole thing, was 99MB. Video files are so huge, I think this is pretty reasonable.

So, I'd recommend giving this a try. And if you create a presentation with video and upload it anywhere (or you've already done this in the past) leave me a link in the comments...

Coming up: online marketing workshops for New Zealand and Australia libraries!

I'm absolutely thrilled to say I'm working with PiCS again, this time to deliver online training. With PiCS I've previously run marketing training in Sydney, Melbourne and Brisbane, and an emerging technologies in Auckland, and they always go all out to put on the best possible day.

If all goes to plan I'll be back in Oz in 2018 to deliver some face-to-face workshops on Presentation Skills (aimed specifically at information professionals), and in the meantime we're collaborating on three workshops online: Marketing your library (running across March, April and May), Digital Marketing and Online Tools (running in June) and Social Media: Next Steps (running across July and August).

It's all quite complicated because of running them at different times for different time-zones. Each course takes place in two sessions - 2 hours one week, then 2 hours the next week at the same time. There are New Zealand versions and Australia versions... Here are the details:

For me and Viv at PiCS trying to work out timings here has been brain-meltingly complicated, not least because in the case of the New Zealand timings I'm actually delivering them at 10pm the previous day, UK-time, for them to run at 9am Auckland time! The Australian ones are slightly more straightforward, with the training happening at 6am for me...

Anyhow, I'm really looking forward to this. All the courses are tailored for the online environment and I promise we won't be in the standard 'death by webinar' mode here: these are interactive, participatory, and hands-on workshops: you'll be DOING as well as watching and listening. It's going to be ace.

For info on the content and booking etc see the individual workshop pages linked above - for the rest of this post I'm going to use a Q&A format to explain some more about how these sessions will work.

How long are the workshops?

Each session is 2 hours long - any more than that is too much screen time in my experience. There'll be a 5 minute break in the middle, and pratical exercises throughout so it's by no means listening to me for 2 hours. Then there's a week off and a second session of 2 hours, and in between there might be some activities to explore and report back on. So in total each set of workshops will take 4 hours.

Will I be able to ask questions and interact with fellow attendees?

Yes absolutely. I use two screens, one of which has the discussion window open the whole time - so I can pick up questions as they come in rather than needing a section of the training where a moderator coordinates the questions. You can also talk to each other in the discussion. And you can message me in the session if you want to ask a non-public question.

Could I attend all three courses or is there overlap in content?

All three courses are about communciation so certain themes run through each, but none of the fundamental content is the same and none of the tasks and exercises are the same.

I came to your LIANZA marketing workshop on marketing - should I still sign up for the online version?

The workshop at LIANZA was a super-condensed version of the workshop, crammed into 1.5 hours and needing to work for 130 people! Places on these new sessions are limited to small numbers, and over more than twice the time, so the marketing one does contain a lot of material that wasn't included at LIANZA. I've also added a few new sections to the training since late 2015. However there is some overlap! So you'll hear a few things you heard previously. But I'd say there's enough new and additonal content to make it worthwhile.

I came to your Digital Marketing & Online Training full day in Auckland - should I still sign up to the online version?

I'd say 'no'. Although there's new content since the Auckland workshop, a lot of it will cover similar topics so you'll find yourself repeating exercises. Of course you're more than welcome to attend anyway! But I'd recommend attending one or both of the other two workshops (Marketing your library service, and Social Media: Next Steps) instead.

I came to your Marketing Your Library full day in Brisbane / Sydney / Melbourne - should I still sign up for the online version?

The workshop does have some new sections in since the sessions I ran in Australia but a lot of the content is similar, so I'd recommend signing up for one of the other two online workshops instead.

Can I see just the workshops listed for my time zone?

Yes you can!

Or there's more details including links to booking below:

I have more questions!

No problem, either leave them in a comment, or send me an email.

I look forward to seeing some of you online!