If you're a graphic designer you probably use a professional tool like Adobe InDesign or Photoshop to make leaflets, posters, infographics and other digital images. If, like me, you're not, and those tools are beyond both your budget and capacity to learn complicated programmes you're not going to use that often, you need an alternative.
I've written on here before about Canva, which is excellent for more than just presentations, and I like Phoster in the iOS app store for designing digital posters. But an under-rated tool for Design is PowerPoint. The main reasons are it's a lot more flexible than it's often given credit for, and it's incredibly easy to layer content (to put text over images, etc) - something which is maddeningly difficult to do in Word, for example.
So here are the key aspects to using PowerPoint for design.
1) You can make a slide ANY size, and save it as a JPG or PNG file

Go to Design, Slide Size then Custom Slide Size to get to this menu
PowerPoint defaults to a 4:3 or 16:9 slide - but you can edit the slide to be any shape, size and proportions. Open a new presentation and go to Design then Slide Size and choose Custom Slide Size you can bring up this drop-down menu, or just put in the custom dimensions of your choice.
Everything becomes easier with design when your canvas is the perfect dimensions to start off with. Sizes like A3 and A4 are self-explanatory if you're designing flyers or posters, but also think about digital image sizes. For example:
- A Twitter image (which is to say a perfectly sized image which doesn't require users to click to expand when viewing it's tweeted) is W: 116 mm x H 232mm
- An Instagram image can be any square, but optimally is 134mm x 134mm
- A Facebook image is 317mm x 317mm
- A YouTube custom video thumbnail is H: 190mm x W: 338mm
(You can work out any pixels to mm dimensions using an online converter: I used this one for the above.)
Once you've created blank slides in a variety of useful sizes, save them to use as a template more quickly in the future.
2) You can install fantastic typography
As anyone who has attended my presentation skills training will attest, I'm always banging on about how Typography is a hugely underrated part of design. Fonts matter a lot, and can make the difference between something looking and the same thing looking really professional.
As always, I'd highly reccomend fontsquirrel as a souce of fantastic (and free to use) fonts - and see the previous post for more info on font-pairings.

Click to go to the font-pairing post
3) It's easy to manipulate images in useful ways
You can find the ideal image from a CC0 site like Pexels, and make it easier to use - to layer text on top of, for example - using PPTs editing tools. They're nowhere near as sophisticated as those in Photoshop, but it's still really useful. Particularly darkening images using the Brightness slider so that white text clearly shows up on it, or blurring images. Both of these techniques are explained in more detail here.
You can also Crop images to specific shapes, circles for example, which can help with really striking design.
4) You can follow the basic principles of good design, and that's more important than the tool
I've found that I really like design without truly understanding it like a proper designer would, but certain rules apply across the board and help me with whatever I'm doing:
- Images AS the background most often works better than images against a background (unless you're using icons).
- Space is good. Leave space.
- No more than three fonts per design. And use fonts that help you communicate your message - or, to use a phrase I'm not altogether comfortable with for some reason, but it seems to apply here: use fonts intentionally.
- The most important thing about text is legibility. Make sure text is large, and the contrast is high between the text and the background.
- Left-align text unless there's a specific reason to Centre-align it (or very occasionally right-align or justify).
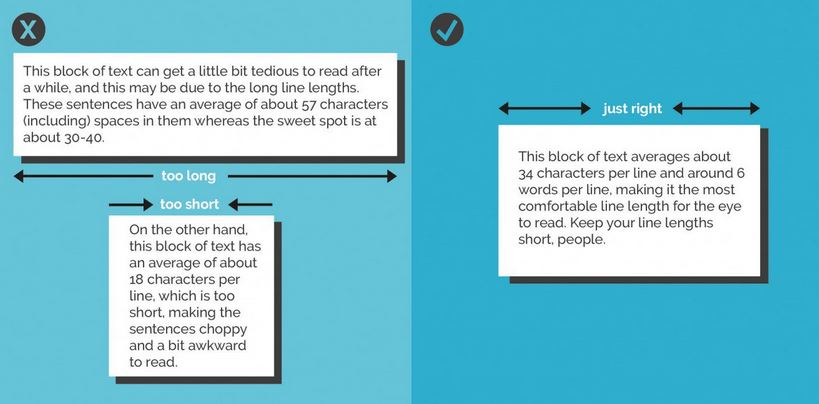
- Avoid orphan or widow words. Just stretch your text box a little more, or narrow it, so words aren't left on a line of their own. Canva's helpful design rules also have this to say on line length:
5) Save slides as images
You can save your PowerPoint as a PPTX to come back to the design later, but you can also save a slide as an image, or a whole bunch of slides as seperate images.
When you go to Save As, choose JPEG or PNG from the drop-down menu - it will then give you the choice of saving just the slide you're on at the moment as an image, or to create a folder into which it will save all the slides in the presentation as individual images.

Saving slides as JPEGs
And finally, while we're on the Save As function, here's a brief guide to which format to save regular presentations in depending on your situation...
